

Let’s have a look at IPv6 support and some history for Microsoft Windows, Apple MacOS and Linux implementations of our new Internet Protocol.

In 1996 – after the first Draft of the IPv6 Specification from December 1995 in RFC1883 the first IPv6 code was included in Linux Kernel 2.1.8.
In 2000 – the Japanese USAGI project sets a goal to fully implement IPv6 on Linux.
In 2008 – the IPv6 implementation in Linux was nearly complete in Kernel 2.6.
Please watch my following video with an introduction to IPv6 for the different operating systems, including Linux:
How to display IPv6 addresses on Linux
$ ip -6 addr list
1: lo: <LOOPBACK,UP,LOWER_UP> mtu 65536
    inet6 ::1/128 scope host
       valid_lft forever preferred_lft forever
5: br0: <BROADCAST,MULTICAST,UP, LOWER_UP> mtu 1500
    inet6 2a02:69e0:1337::1/64 scope global
       valid_lft forever preferred_lft forever
    inet6 fe80::20c:f6ff:fefc:84d6/64 scope link
       valid_lft forever preferred_lft forever
the ip command is part of the iproute2 package, which is the standard and state of the art userspace utility to work with ip addresses and routing across all versions of the Internet Protocol.
How to configure a static address for IPv6 on Linux
$ ip -6 addr add 2a02:69e0:1337::1/64 dev eth0
Using the same ip command from the iproute2 suite of tools you can just add the IPv6 address with prefix notation to a specified interface, here eth0.
How to remove a static address for IPv6 on Linux
$ ip -6 addr del 2a02:69e0:1337::1/64 dev eth0
The same command applies for removing an address, just replace add with del.
How to display the neighbor cache for IPv6 on Linux
$ ip -6 neigh show
fe80::218:19ff:fe55:6a44 dev br0 lladdr 00:18:19:55:6a:44 router STALE
fe80::218:19ff:fe55:6a7a dev br0 lladdr 00:18:19:55:6a:7a router STALE
fe80::218:19ff:fe55:6a67 dev br0 lladdr 00:18:19:55:6a:67 router REACHABLE
The IPv6 neighbor cache is a critical part of the protocol’s internals and can uncover some interesting information.
How to configure default route for IPv6 on Linux
$ ip -6 route add ::/0 via 2a02:69e0:1337::23
A default route is probably the most important route for a host, because it acts as a catch-all route and all traffic that is not sent to another “more specific” destination is sent here…
With IPv6, remember the special destination in this case is ::/0, which means “all routes“
How to set a generic route for IPv6 on Linux
$ ip -6 route add 2a02:69e0::/32 via 2a02:69e0:1337::23
Apart from one default route, we might have the need for additional more specific routes or special routes, that are reachable via a different path than the default route. The syntax is essentially the same, just replace the special route ::/0 with a more specific in the same prefix/length notation that is specific for IPv6.
How to remove a generic route for IPv6 on Linux
$ ip -6 route del 2a02:69e0::/32 via 2a02:69e0:1337::23
Any route like more specifics and the default route can be removed again using the above standard iproute2 syntax. (Click the link if you would like to read the Linux man page (Manual) for detailed syntax declaration and full explanation.)
How to display the routing table for IPv6 on Linux
$ ip -6 route list
2a02:69e0:1337::/64 dev br0  proto kernel  metric 256
fe80::/64 dev br0  proto kernel  metric 256
default via fe80::218:19ff:fe55:6a67 dev br0  proto ra  metric 1024  expires 1684sec
At last, there is the one simple command to display the Linux IPv6 routing table.
How to do a Ping to verify connectivity for IPv6 on Linux
$ ping6 google.com
PING google.com (2a00:1450:400c:c0a::65) 56 data bytes 64 bytes from 2a00:1450:400c:c0a::65: icmp_seq=1 ttl=54 time=12.7 ms 64 bytes from 2a00:1450:400c:c0a::65: icmp_seq=2 ttl=54 time=13.0 ms 64 bytes from 2a00:1450:400c:c0a::65: icmp_seq=3 ttl=54 time=13.0 ms 64 bytes from 2a00:1450:400c:c0a::65: icmp_seq=4 ttl=54 time=12.9 ms
Very similar to Microsoft’s implementation of IPv6 on Windows, ping6 is the IPv6 alternative to the old ping command also for Linux. Ping is used to check if there is end-to-end reachability between your host and a destination. You can either use an IPv6 address for the destination, or use a DNS name (it works!) but be aware – when using a DNS name you cannot be 100% sure that IPv6 is used as transport instead of IPv4.
Check out the parts about Source Protocol Selection and Source Address Selection to understand which Protocol and which address is used when initiating a connection!
How to do a Traceroute to verify Routing and Path for IPv6 on Linux
$ traceroute6 google.com
traceroute to google.com (2a00:1450:400c:c0a::8b), 30 hops max, 80 byte packets
 1  denuecore01.pall.as (2a02:69e0:500::1)  0.717 ms
 2  denuecore00-2.pall.as (2a01:4f8:0:e0b0::25)  0.320 ms
 3  core12.hetzner.de (2a01:4f8:0:3::39)  0.389 ms
 4  2a01:4f8:0:3::fa (2a01:4f8:0:3::fa)  3.560 ms
 5  juniper4.ffm.hetzner.de (2a01:4f8:0:3::e)  3.521 ms
 6  de-cix10.net.google.com (2001:7f8::3b41:0:1)  40.654 ms
 7  2001:4860::1:0:4ca2 (2001:4860::1:0:4ca2)  4.579 ms
8  2001:4860::2:0:a94a (2001:4860::2:0:a94a)  12.977 ms
9  wl-in-x8b.1e100.net (2a00:1450:400c:c0a::8b)  12.736 ms
Traceroute is used to see the different routing (Layer 3) hops along the path of a packet that is transferred between the local host and a remote destination. The Linux command is traceroute6 and here is the complete man page (Linux Manual) for it. is the IPv6 alternative to the IPv4 traceroute command. You can either use an IPv6 address for the destination, or use a DNS name (it works!) but be aware – when using a DNS name you cannot be 100% sure that IPv6 is used as transport instead of IPv4.
Same as with Ping, check out the parts about Source Protocol Selection and Source Address Selection again to understand which Protocol and which address is used when initiating a connection.
How to see live Packet Loss using mtr for IPv6 on Linux
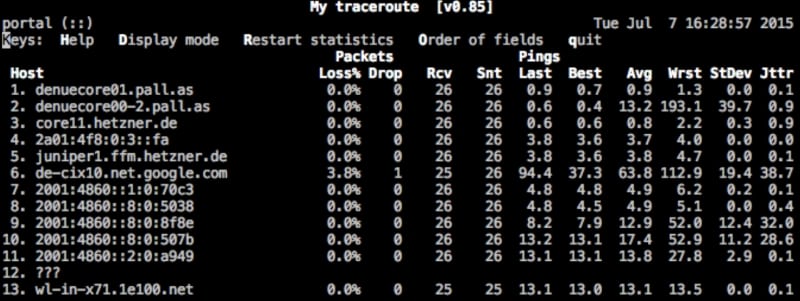
You know what traceroute is and why it is so helpful. The Linux utility My Traceroute (mtr), which is also available for MacOS via homebrew, does a kind of a live traceroute and sends packets every second. You are able to see live where packet loss happens or latency increases. I love this tool and highly recommend you try it out, for IPv6 and IPv4!
How to disable IPv6 on Linux
I cannot recommend disabling IPv6 on Linux and recommend learning enough about it so you can configure and enjoy it. Disabling IPv6 might also break some things that are dependent on it. Still, in some cases you might want or even need to disable it.
First, disable IPv6 in runtime on your Linux machine:
$ sudo sysctl -w net.ipv6.conf.default.disable_ipv6=1 $ sudo sysctl -w net.ipv6.conf.lo.disable_ipv6=1 $ sudo sysctl -w net.ipv6.conf.all.disable_ipv6=1
And depending on your Linux distribution you might need to make sure this is reboot safe by writing it into /etc/sysctl.conf:
net.ipv6.conf.default.disable_ipv6 = 1
net.ipv6.conf.lo.disable_ipv6 = 1
net.ipv6.conf.all.disable_ipv6 = 1
Now you can reboot your Linux machine into an IPv6 free state.
If you had enough of life without IPv6, read on:
How to enable IPv6 on Linux
I’m glad you want to (re-) enable IPv6 on your Linux machine. This should be quick and easy.
First, enable IPv6 in runtime on your Linux machine:
$ sudo sysctl -w net.ipv6.conf.default.disable_ipv6=0
$ sudo sysctl -w net.ipv6.conf.lo.disable_ipv6=0
$ sudo sysctl -w net.ipv6.conf.all.disable_ipv6=0
And depending on your Linux distribution you might need to make sure this is reboot safe by writing it into /etc/sysctl.conf:
net.ipv6.conf.default.disable_ipv6 = 0
net.ipv6.conf.lo.disable_ipv6 = 0
net.ipv6.conf.all.disable_ipv6 = 0
Now you can reboot your Linux machine to be back on full IPv6 support. In case you need to do more configuration, follow the previous steps on how to configure addresses and routing and how you troubleshoot your Linux IPv6 implementation.
Troubleshooting IPv6 on Linux
Watch my video on troubleshooting IPv6 on Linux:
Thank You
Thank you for attending the Original IPv6 Foundation Master Class! You can bookmark this site to use it as a quick reference in case you need to re-read something and you can share this page to social media and your friends and colleagues. Stay tuned to this blog for more in-depth stories like this one.
Recommended Resources for additional reading
Apart from the links throughout this course I recommend the following resources for additional information:
- The Internet Society (ISOC) IPv6 Portal
- Test your IPv6 connectivity on test-ipv6.com
- The official IANA list of assigned IPv6 address space is very interesting
- The Google IPv6 deployment statistics
- The RIPE NCC IPv6 working group and mailing list
Book recommendations on IPv6
I can recommend the following 3 books which I enjoyed reading:

This concludes IPv6 Foundation Part 8: IPv6 on Linux of the original IPv6 Foundation Master Class.
Previous Part: IPv6 Foundation Part 7: IPv6 on Windows
Next Part: IPv6 Foundation Part 9: IPv6 on Mac