
What is Ezoic
Table of Contents
You might have noticed I run some ads on this site. I have been using ezoic for a while now on this blog. ezoic is an advertising company essentially marketing ad space on this blog to advertisers. They take care of all the bidding and get the best deal in every ad slot. Compared to other monetization options I am very happy that I switched from Adsense over to ezoic, since my ad revenue has increased significantly.
I can recommend their service and if you run a blog or website of your own and want to increase revenue substantially, you should definitely check them out!
The Ezoic Ad Implementation
Usually the advertisers’ code (Javascript) is implemented on your website and once the visitor has loaded the site from your server, the ad code is run locally and ads are displayed.
This is different with ezoic.
What’s special about ezoic is that you don’t integrate ad code on your site and have the site provided directly by your web server to the user, but the ezoic servers (they are using the Amazon AWS cloud) along with Cloudflare actually deliver the HTML to your users, after inserting the best-bidding ads, tailored to the specific request (screen size and other dynamic criteria)
How Sites using Ezoic are delivered to the Viewer with Cloudflare
To understand the complete delivery process from the user’s request of an ezoic-enabled website, until it is displayed in their browser, have a look at this complex flow:
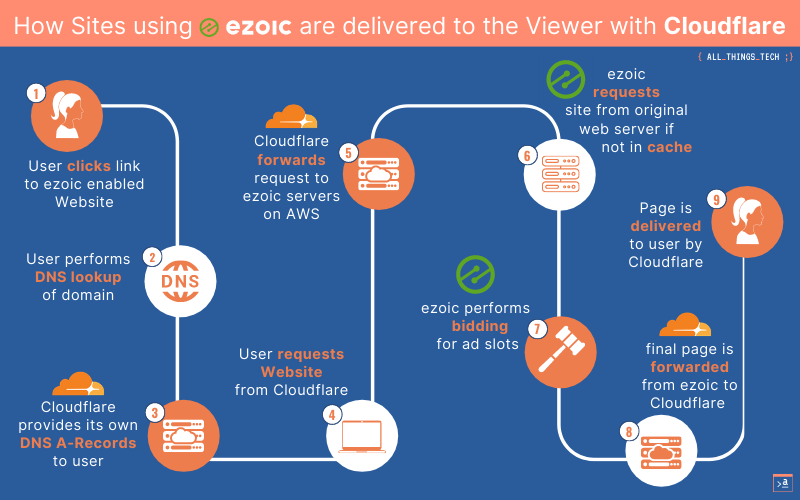
This is the reason why you need to make sure that everything that you control is as fast as possible to speed up the whole process.
The Best Ezoic Performance Setup
Now that you understand the flow of information, let’s dive right in and make this as quick as possible!
How to integrate a site with Ezoic? (3 Options)
There are different options to integrate your website with ezoic:
- Cloudflare Integration (I choose this! Cloudflare runs the DNS server)
- DNS Server integration (this means having Ezoic run the DNS server)
- WordPress Plugin (not recommended, most of performance options are not usable)
I chose #1 – Cloudflare integration to have my DNS independent from the company that currently provides me with some monetization. This helps if one day I want to change providers.
Why use Cloudflare to speed up your Blog
Cloudflare is a leading Content Delivery Network (CDN) with helps you get your website content delivered to your viewers quicker and in a decentralized way. If you have a global audience but usually only one server, then all requests and resources have to be requested and delivered by your one server. Most websites today have tens or even hundreds of assets like CSS, images, Javascript, so this is a lot of connections that have to be created – in the worst case from the viewer in Australia all the way to your server in the US. This increases load time and all other metrics that are important for your rankings and organic reach, like Google’s new Core Web Vitals.
A CDN steps in here and caches these static resources close to the viewers. In our example – for the first connection from Australia the resources are indeed requested from the origin server and then cached at the nearest Cloudflare location. The next request from Australia would be delivered directly from Cloudflare in Australia and not handed over to the other end of the world, your origin server.
Cloudflare offers a free plan that suits most needs of a blog:
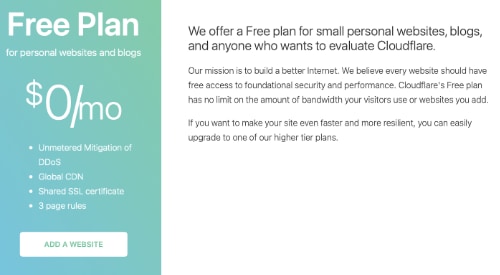
It makes total sense to use a Content Delivery Network like Cloudflare to speed up your site significantly and take load off your origin server. If you don’t have Cloudflare yet – make a free account and set it up according to this tutorial.
How to integrate Cloudflare with Ezoic – optimal settings for maximum Performance
Integration of ezoic with Cloudflare usually takes just a couple of minutes. Be aware that it takes more time and more steps for any ads to be displayed.
First things first -> technical integration of ezoic and Cloudflare
(1) Log on to the ezoic Dashboard and add your domain
Once logged in to your Dashboard, click “Add a site” in the top right menu bar:

The Ezoic add your site wizard opens. Fill in your domain name:
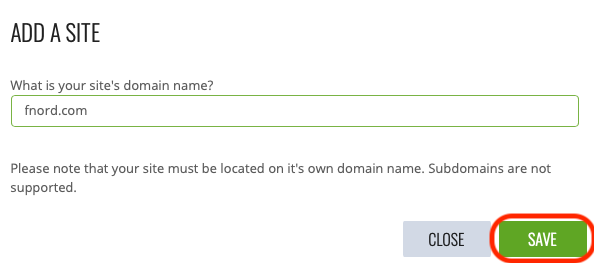
That’s it! (Okay, there are a couple more steps)

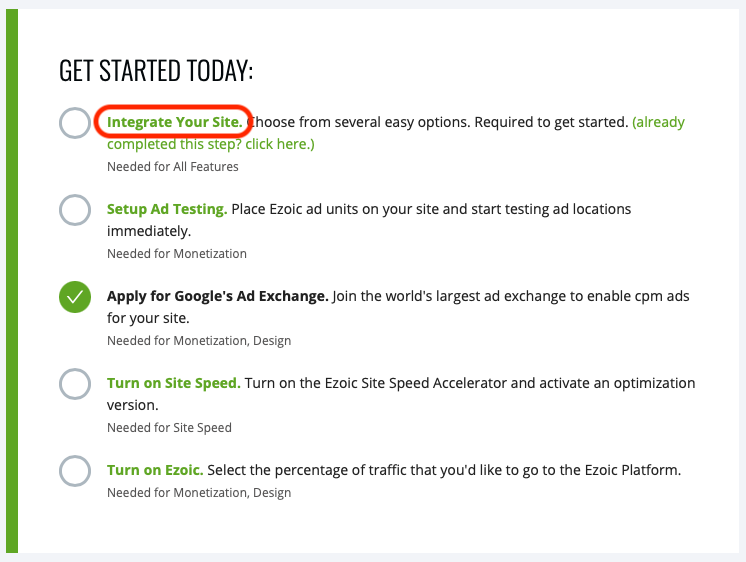
(2) Integrate Ezoic with Cloudflare
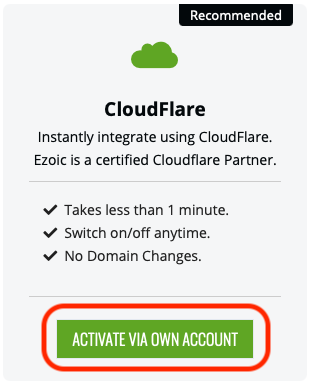
This guide is about best ezoic performance integration with Cloudflare and Litespeed so click the first option “Integrate Your Site”:
Another Wizard opens – choose Instantly integrate with Cloudflare. You are reminded that no domain changes are performed here, so your domain stays the same, DNS stays with Cloudflare. Ezoic and Cloudflare are just put in as a proxy. All data stays on your servers and nothing is moved to either Cloudflare nor ezoic.
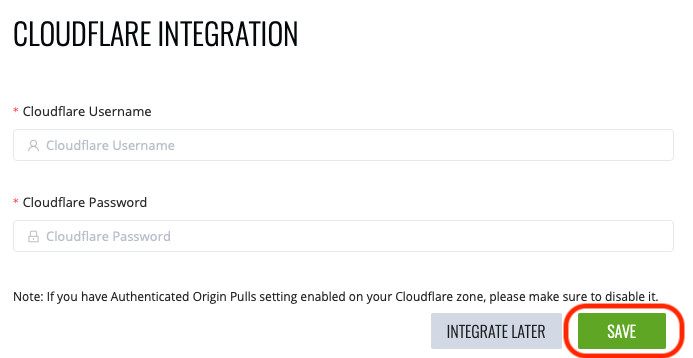
Enter your Cloudflare username (or email address), your Cloudflare password and click save:
Congratulations! Your domain has now been added to ezoic and connected via Cloudflare.
Optimal Cloudflare settings for Ezoic
Cloudflare DNS Settings
During the last step we have successfully connected ezoic and Cloudflare. A couple of new DNS records (CNAMEs) have been added by ezoic to your domains’ DNS. They handle the forwarding of all traffic that hits your domain on Cloudflare to the ezoic servers, as a proxy:
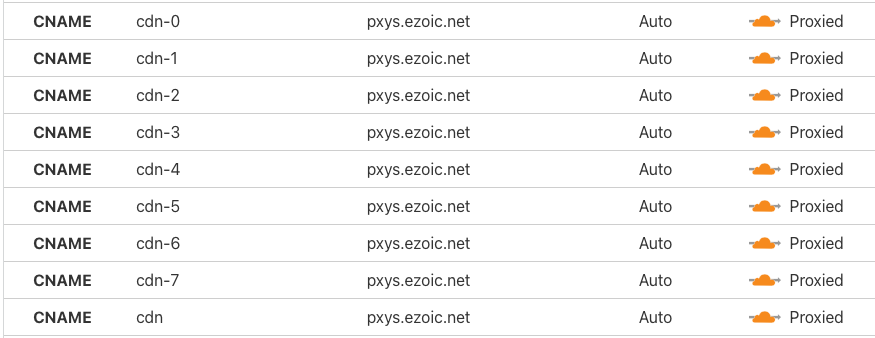
You don’t need to change anything else in the DNS dashboard. Everything was configured automatically as needed by the Ezoic integration scripts.
Cloudflare SSL/TLS Encryption Settings
Make sure you have a valid SSL certificate on your origin server or get a free one from Let’s Encrypt and then activate “Full (strict) SSL/TLS“:

On the Edge Certificates tab in the dashboard check “Always use HTTPS” to always redirect HTTP requests to HTTPS. This creates an automatic rewrite of requests to http://www.example.com to https://www.example.com and makes sense. You could also add this with a manual rule (more on that later) but since the Cloudflare free plan only includes 3 possible rules, save this one and set it here!
Activate HSTS (HTTP Strict Transport Security) with the recommended settings:

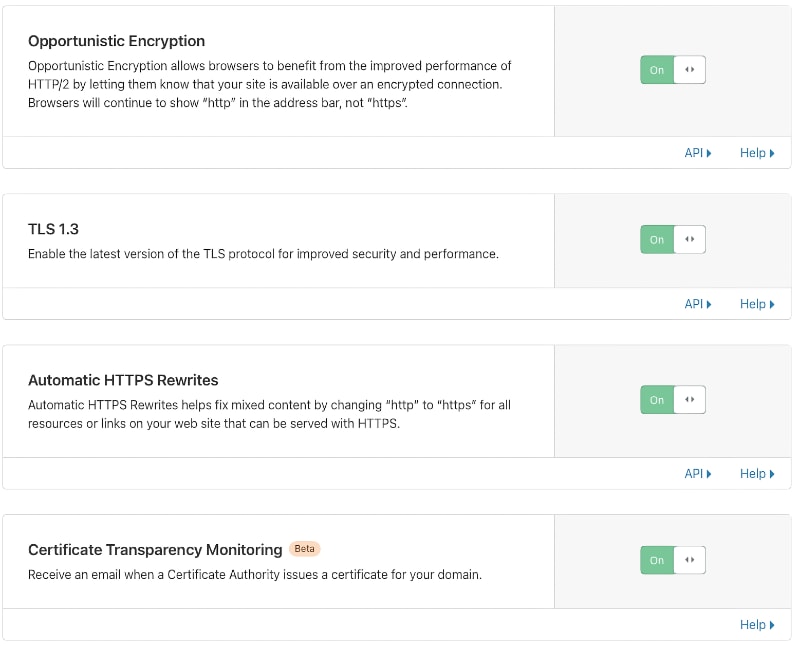
Lastly on this settings tab, activate Opportunistic Encryption, TLS 1.3, Automatic HTTPS Rewrites and Certificate Transparency Monitoring. The last is optional but I recommend it. Cloudflare will send you an email once your origin server’s SSL certificate changes or is renewed. So you can keep better track of extension of your certificate in case you are using Let’s Encrypt (the certificate lifetime is only a couple of months and you want to make sure that it does not run our unextended, or your site will throw SSL errors):
Cloudflare Speed Settings
Head over to the Speed tab in Cloudflare Dashboard -> Optimization. We don’t activate Auto Minify since minification is done by the following Litespeed Webserver already. In my experience, using duplicate minification increases risk of unexpected issues while not benefiting performance (after Litespeed minification, everything is minified already, no need to minify again).
Just activate Brotli Compression here

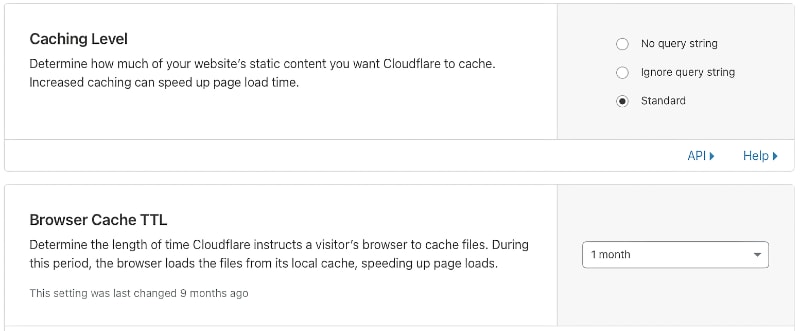
Cloudflare Caching Settings
On the Cloudflare Caching tab make sure to set the Caching Level to “Standard” as “no query string” and “ignore query string” interfere with the Ezoic integration and break things.
Additionally, set the Browser Cache TTL to 1 Month.
This puts a caching header on all static resources that are delivered to the client and tell them to keep these resources in local browser cache, since they do not change frequently. Be aware that normally this is fine, but especially in the case of images, if you update an image which is cached and you don’t change the filename, neither the client nor the Cloudflare servers know that the image has changed and the old image will still be delivered if cached. So if you change an image, make sure to also change the filename up a bit.
In the case of CSS and Javascript, usually either the filename is changed by Litespeed anyway or a version string is appended to it, like main.css?ver=123. If such a reference in HTML points to a file or version that is not currently in cache, the resource will be requested from your origin server. So this works perfectly and you don’t have to worry about caching issues.
Cloudflare Page Rules Settings
The Cloudflare Page Rules tab in your dashboard enables you to place custom configuration. I usually only use this for 301 permanent redirects, like if your site is on www.example.com and you want to redirect all traffic coming to example.com without the www part, you should do this here.
This increases performance a bit for those types of queries, since the 301 redirect is delivered by Cloudflare and your origin server is not asked.
To create the redirect from our example, make sure the origin URL is set to:
example.com/*
and use setting “Forwarding URL” with option “301 – Permanent Redirect” to:
https://www.example.com/$1The asterisk (*) from Source maps the query string to the 301 destination URLs $1, so the original request is kept intact. Usually we want this, to not forward all non-www requests to the root domain, but do this page by page individually and automatically, like:
https://example.com/nice-blog-post/ would be forwarded to:
https://www.example.com/nice-blog-post/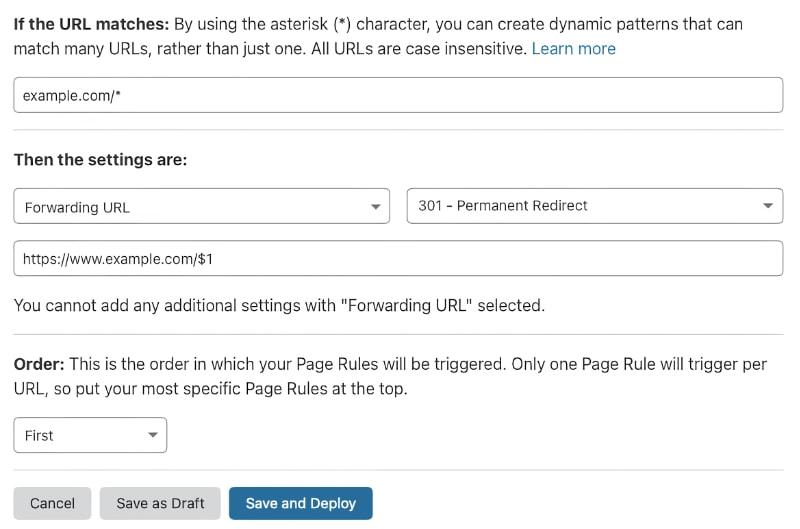
Cloudflare Network Settings
HTTP/2 is enabled automatically. You should also activate HTTP3 with QUIC to improve performance even more. Also 0-RTT Connection Resumption, WebSockets, Onion Routing and IP Geolocation should be checked.
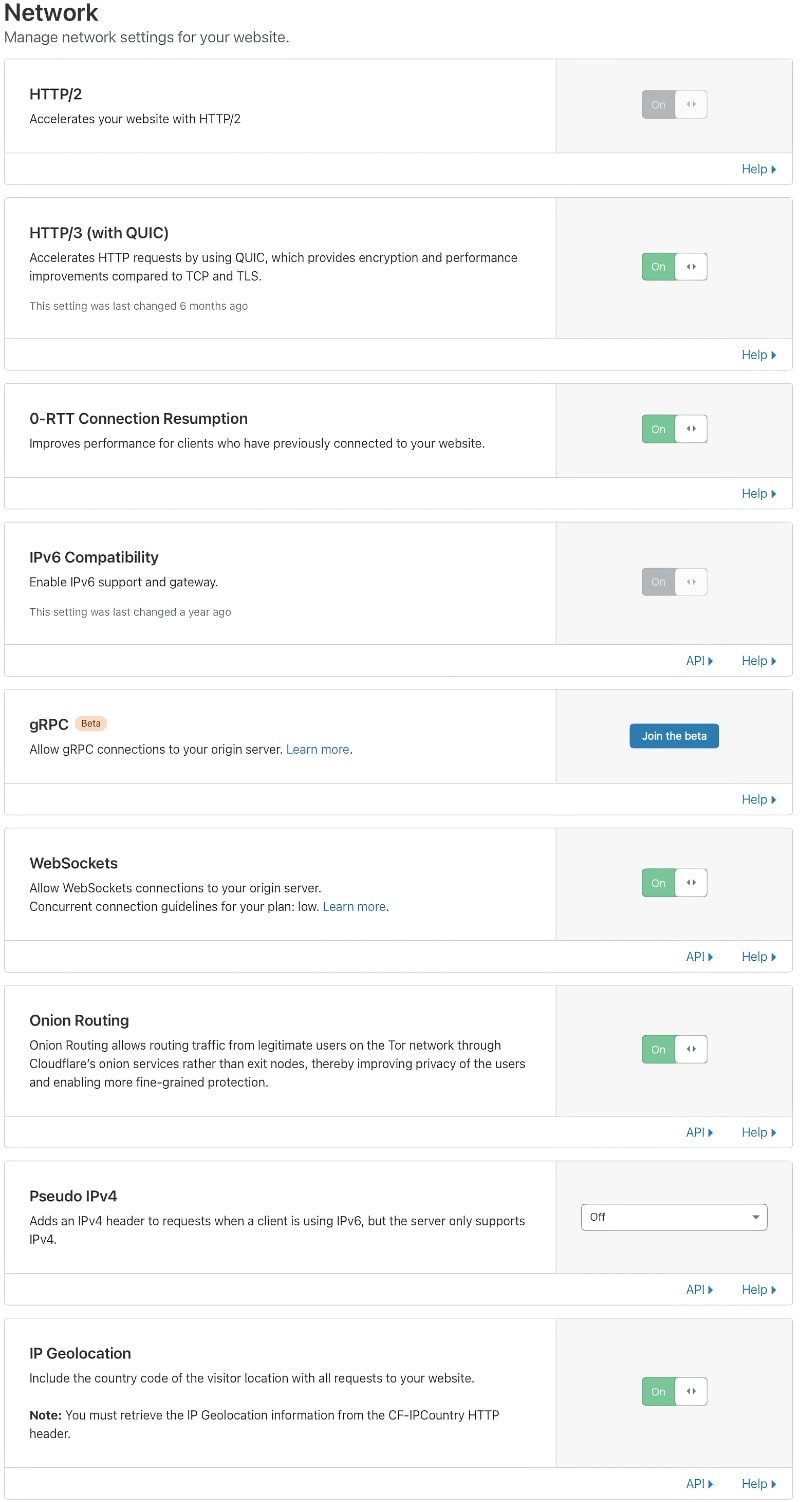
This concludes the Cloudflare settings you should set for optimal Ezoic integration performance. Head over to the Ezoic dashboard to match the recommended settings:
Optimal Ezoic Settings for Performance
After you have successfully integrated your site with Ezoic and Cloudflare and set up all Cloudflare performance settings, it is now time to configure the Ezoic end correctly.
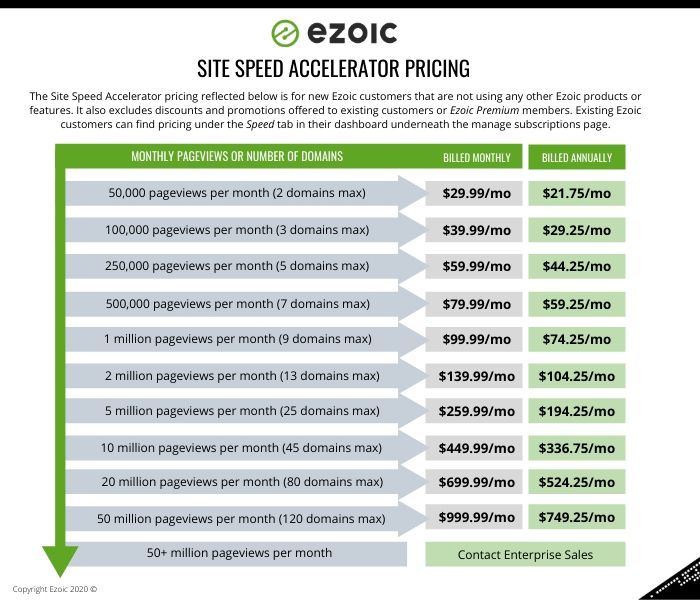
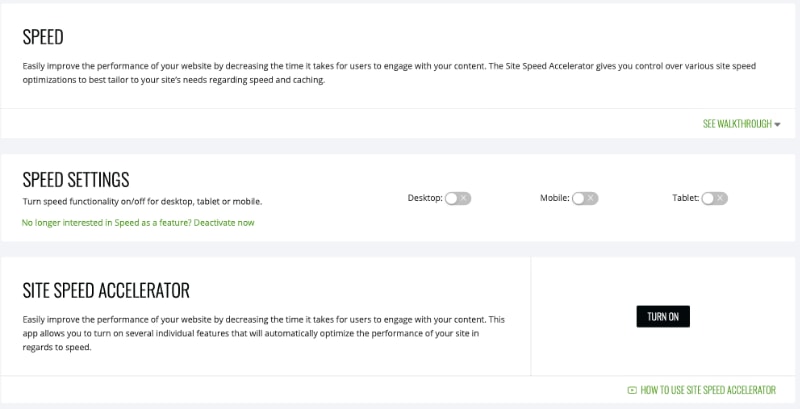
Ezoic Site Speed Accelerator (SSA)
I have tested the Ezoic Site Speed Accelerator (SSA) but at least for me, it did not improve performance over my recommended setup with Cloudflare and Litespeed, thus I am not using it anymore. It costs some money monthly and the pricing depends on the number of visits you get each month:
Since I am not using their Site Speed Accelerator, the settings are disabled on the Ezoic Speed tab:
Ezoic Speed / Caching Settings
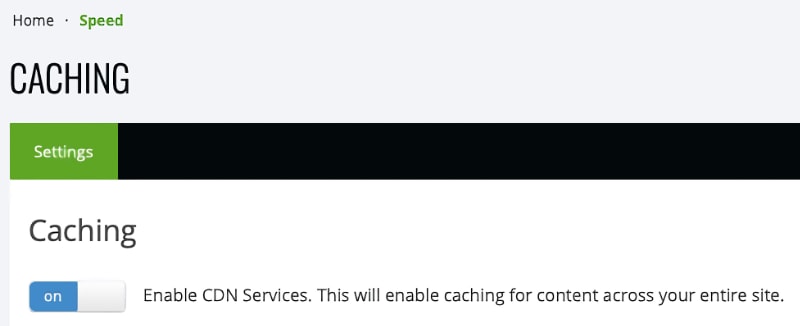
Since I am not using Ezoic Site Speed Accelerator, the only settings we need to adjust are the ones in your Ezoic Dashboard under Speed > Caching.
First of all, turn caching on:
Finally, adjust the Cache Setting Values.
Enable Cache for Cookies should be set to 1. Default Cache Age (s) in Seconds and Maximum Cache Age I have both set to 90000, which equals 25 hours. We want to keep the cache filled (or as also called – warm) for as long as possible if nothing changes, this increases performance dramatically since unchanged pages are only re-requested from the origin server roughly once per day. Pages from cache are delivered directly from the Ezoic servers to the client and not requested from origin – this makes sense.
Remember the Cloudflare part from above. If HTML is delivered from the Ezoic servers and statis resources such as Javascript, CSS and images are delivered from Cloudflare, this enables best performance because your server is not asked for these resources. Ezoic uses the Amazon Web Services Cloud (AWS) and also keeps the resources cached close to your visitor. So a view from Australia will be delivered from within Australia when in cache, no matter where your origin server is located!
Another benefit is that for times of increased visits, like some viral article you just wrote (congrats!) with thousands of simultaneous views will not crash your server.
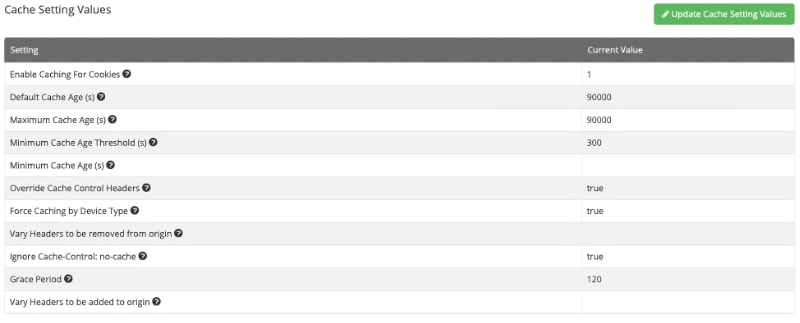
Because either your Litespeed origin server or Cloudflare can interfere with the Cache Control Headers, I recommend you set the Override Cache Control Headers Setting to true. At first without this setting my Ezoic caching rate was very low and pretty much all requests were not delivered from Ezoic cache but requested from my origin server. As you can imaging this causes bad performance (see the flowchart on top of this page, how delivery to the client works) for details.
This setting makes the Ezoic cache work anyway, even if headers are set to “no cache”. Be aware that enabling this dramatically increases the caching rate – which is good – but also for pages that should not be cached you need to exclude them manually in the Cache Exclude Rules section of the Ezoic Caching tab on your dashboard.
Ezoic Caching Issues producing 404 Not Found Errors for CSS resources
After having had some caching issues at first, where old cached HTML was delivered to clients, which linked to deprecated CSS and thus resulting in broken layour and 404 Errors for page resources, I created a self-healing script to find these errors and fix them automatically. Send me a message if you would like access to this script. I will also publish it shortly on this blog in a separate post.
Why this can happen:
- HTML is cached for up to 25 hours as per our settings
- if the page does not change, but maybe your global CSS changes because you did some change on ANOTHER page, CSS is regenerated and gets a new filename, let’s say maincss_124.css
- The cached (and unchanged) HTML is still valid and delivered to clients, but it now references an old CSS version (maincss_123.css) which is not available anymore (hence produces a HTTP 404 Not Found Error)
As a general rule and workaround that always works, just flush the Ezoic cache for the whole site after you did any design changes. Same is true for the Litespeed cache on your site!
That’s all for the Ezoic performance settings. The last part handles your optimal Litespeed Webserver configuration.
Optimal Litespeed Settings for best Performance
I suppose you are already using the free OpenLitespeed Webserver (also called OLS or LSWS) and have set up your domain, Site and WordPress so it is working. Let’s dive into optimal performance settings in combination with Cloudflare and Ezoic. Litespeed also provides an enterprise grade -paid- webserver but I do prefer the open and free version, which provides all features that we need.
OpenLitespeed Webserver Configuration
Go to your OpenLitespeed Webserver dashboard and enter Virtual Host configuration.
Regarding performance, make sure to Enable Compression by setting it to Yes in the General tab:

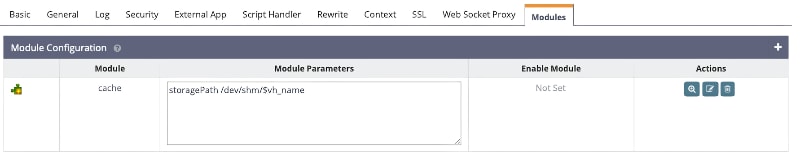
The only additional performance setup you need to make is in the Virtual Host > Modules tab. Enable the Caching module here, which is by default not enabled.
Add the cache module using the plus sign (+) in the top right corner and add the following to Module Parameters:
storagePath /dev/shm/$vh_name
(this creates a caching directory on startup of the Litespeed Webserver in RAM where the statically cached files HTML will be placed)
Enable Module you can leave at “Not Set”. This option is later overridden by the WordPress LSCache module.
Always do a graceful restart of your Litespeed Webserver after changing configuration settings so they take effect: ![]()
LiteSpeed Cache WordPress Plugin Configuration
After the basic Litespeed Webserver configuration we need to set up the LiteSpeed Cache Plugin.
Go get it from the official WordPress Plugin repository, install and activate it:
LiteSpeed Cache – General Settings
In the General Settings tab on your WordPress LiteSpeed Cache plugin configuration screen make sure to enter your server’s real, public IPv4 address in the field Server IP.
Then head over to the Cache tab.
LiteSpeed Cache – Cache Settings
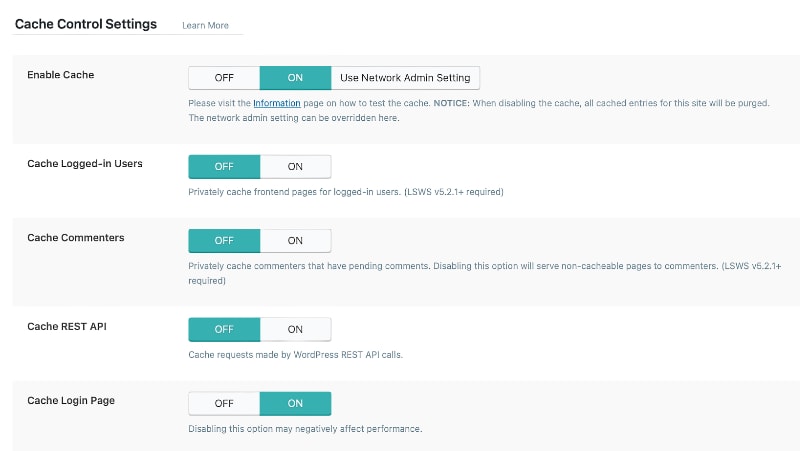
In Cache Settings the Cache for your site needs to be enabled. We did not enable it globally before on the Litespeed Webserver configuration interface, so we need to do it here!
Usually you do not want logged-in users to be cached. At least for me. Either they adre administrators and you don’t want to provide any caching-issues to them, or editors (the same) or you provide highly dynamic content to logged in users and also don’t want caching for those.
Alternatively you could enable caching for logged in users based on your preference and later exclude specific roles, such as administrators, from caching.
Cache Commenters turned OFF makes sense, so once somebody left a comment, you want to show them a resulting version of the page where the comment is either already included (if you auto-approve your WordPress comments) or at least their comment with the addition “awaiting moderation” is shown. Else they would submit the comment, the page reloads to its cached version from before the comment and the commenter would think their comment was not sent successfully.
You also don’t want your REST API to be cached in any way since those requests are highly dynamic and need to be “live” and not old.
Caching the Login page again makes sense, unless it displays highly dynamic content that needs to change on each login page load.
LiteSpeed Cache – TTL Settings (Time to Live)
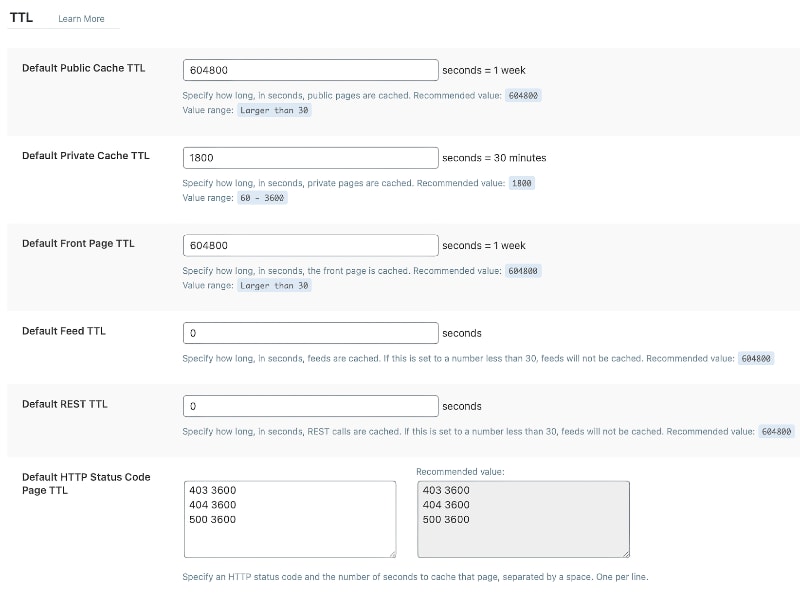
The next tab in the WordPress LiteSpeed Cache Plugin configuration is the TTL tab taking care of all the Time to Live values.
I like the Default Public Cache TTL and Default Front Page TTL to be at 1 week. Take into account, that the cache should be kept warm (full) always and for as long as possible. If something changes the cache is cleared anyway, so don’t worry that a long cache TTL means serving outdated content for a week. This does not happen.
The Default Private Cache TTL can be kept at 30 minutes, which is recommended.
LiteSpeed Cache – Purge Settings
The LiteSpeed Cache WordPress Purge Settings page is critical, since you want the relevant cache entries to be cleared once you make a change that affects it.
The best example is if you publish a new post and have dynamic pages that reference this post, like your front page, or category and tag pages, or the sidebar of your other posts which you want to feature this “newly added post” on. You probably want all these pages top be flushed from cache so a new and updated version is available. Tick all these settings to enable this
- All pages
- Front page
- Home page
- Pages
- All Pages with Recent Posts Widget
- Author Archives (if you have those)
- Post Type Archives
- Monthly Archive (if you have those)
- Term Archive (for tag pages etc.)
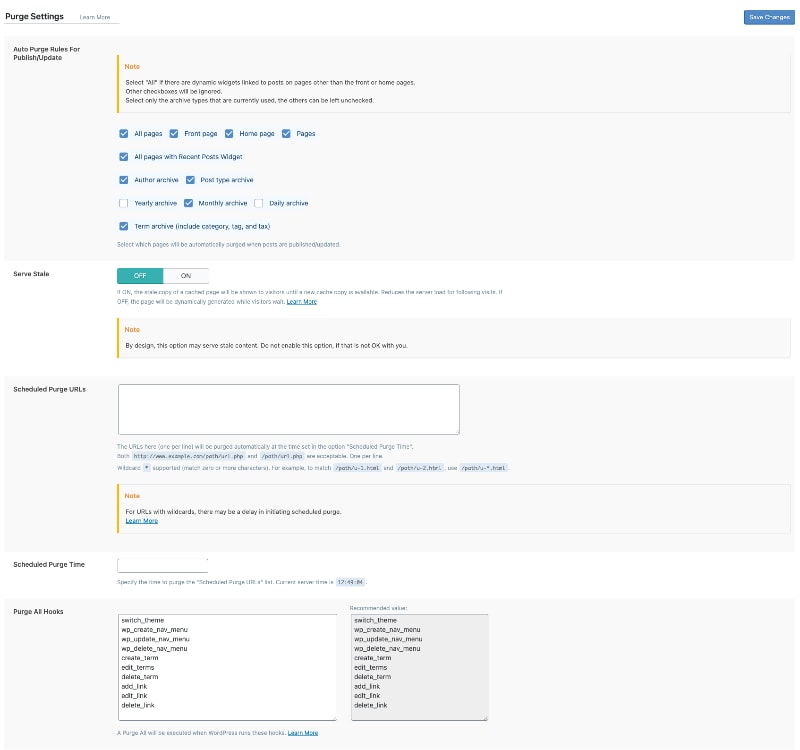
If unsure, just check all of them according to this screenshot. It does not hurt to flush more than you need, it will not break things, I promise!
As always, the cache should be filled and “warm” at all times. But clearing it is also critical to serve updated and new content! So always clear the cache if you change something
LiteSpeed Cache – Exclude Settings
You might want to disable caching for some pages that change for each visitor. You can add thise URLs (URIs) on the Excludes tab.
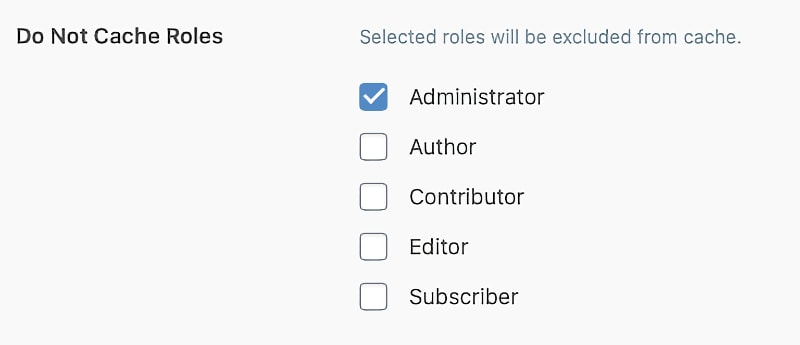
Additionally, here is your second chance, if you enabled caching for logged in users before, to exclude specific user roles, usually administrators, from being served cached content:
LiteSpeed Cache – ESI and Advanced Settings
Since we are using the free OpenLitespeed Webserver which does not provide ESI features, you do not need to change anything on either the ESI nor the Advanced tab. Keep it as it is by default.
LiteSpeed Cache – CDN Settings
In the CDN (Content Delivery Network) tab, set Use CDN Mapping to ON, since you are using Cloudflare.
Leave the rest as is.

On the bottom of the page, make sure to add your Cloudflare email address, password and enter your domain, such as example.com exactly as named in your Cloudflare account.
Turn Cloudflare API to ON.
This enables the Litespeed Cache module to also tell Cloudflare to flush things, if needed (such as changing images, CSS or Javascript).
HTML is not cached by default at Cloudflare, so don’t worry about it.

LiteSpeed Cache – Image Optimization Settings using QUIC.cloud
Litespeed provides a cloud service to optimize images. There is also a free tier if you would like tom try it. They call it QUIC.cloud.
You should sign up for the free tier and add your domain. The service generated webp images and compresses and optimizes your images for optimal performance.
To get high Speed and Performance scores on the Google Web Speed tool and others such as WebPageTest, Pingdom, GTMetrix and -even more importantly, please your visitors– you should deliver the next generation image standard WEBP to browsers supporting it, such as Chrome, but deliver the classic images (JPG/PNG) to browsers not currently supporting this standard, like Safari.
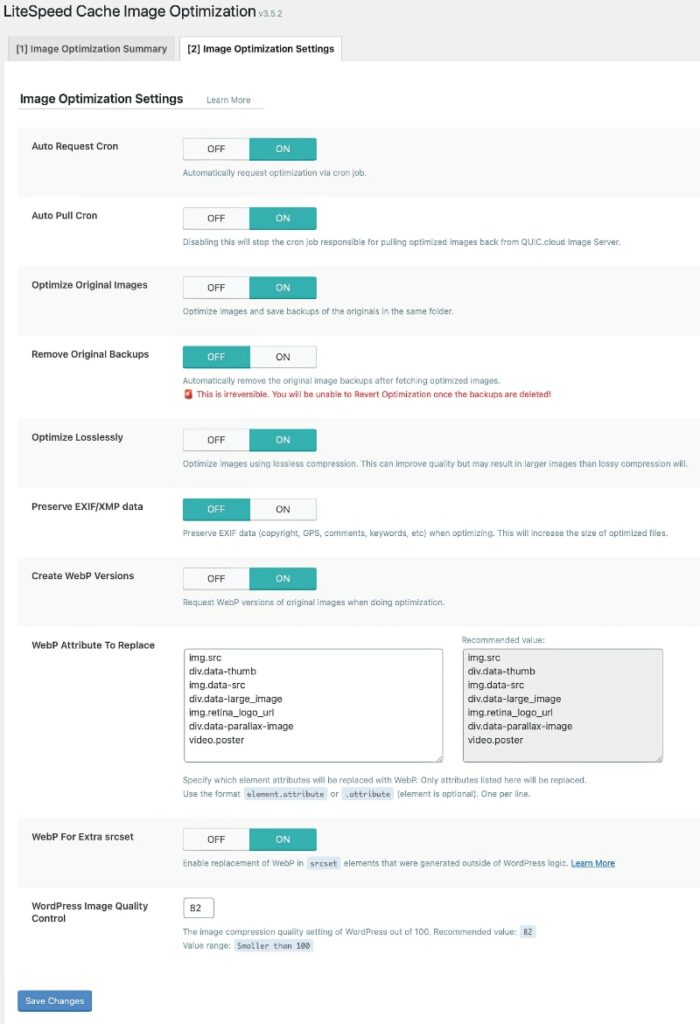
Image optimization is automatically requested in the background and the best images are delivered to the client. This is great, don’t skip it.
Please don’t check Remove Original Backups unless you are really extremely low on webserver space. You probably want to keep those original source images for future use.
LiteSpeed Cache – CSS Page Optimization Settings for Best Performance
For optimal speed and performance, while not sacrificing usability, you should play around with the settings on the Page Optimization tab. Not every setting works for every website, so I can only recommend my basic settings here. Check them out, do thorough testing and be prepared to change individual settings as needed.
CSS minify is critical, we did not activate this at the Cloudflare level because I like to keep optimizations as close to the source as possible. A once-cached resource at the origin can be pushed through Cloudflare without any delay. This is better than sending an unminified version upstream and having it compressed by Cloudflare each time. Even though their performance is great, it takes a couple of milliseconds that you can also better save!
With HTTP2, most people say that doing multiple parallel requests is recommended over a single larger request. This is why CSS combine is is not activated here, in case you wonder.
Having a Unique CSS File per page might make the CSS per page a slight bit smaller, but if users move around on your site, they have to get a new CSS for the next page each time. So the rule of thumb here is: if you have a lot of landing pages and users don’t move around your site, but usually enter and leave a single page only, you can set Unique CSS File to on. Otherwise better leave it off. The first page requested from your site will deliver the needed CSS and all subsequent pages use this same CSS (which is cached locally in the user’s browser). Increased performance is the result!
CSS HTTP/2 push have me unexpected sudden errors, so it is disabled.
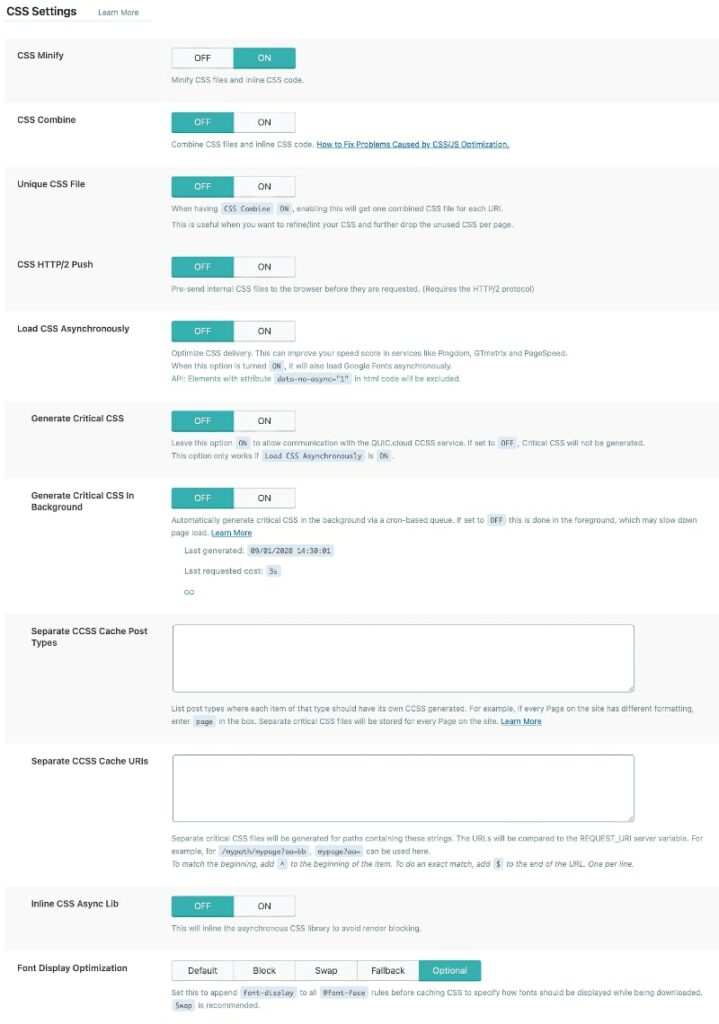
Set Font Display Optimization to Optional. This provides even more performance than setting it old-style to Swap.
LiteSpeed Cache – Javascript Page Optimization Settings for Best Performance
Minification for Javascript, like for CSS should be turned ON, since we prefer not do do this at the Cloudflare level for reasons stated earlier.
JS Combine is turned off for the same reason as for CSS regarding HTTP/2 and additional caching issues that could arise. If “something” on any page changes the global CSS – if it is within one file – other cached pages might still reference an old version of this single CSS and have major broken design.
It’s best to leave it off for performance and stability reasons.
JS Combine External and Inline only applies if JS Combine is set to ON, which it is not, so Combine External is OFF, too.
JS HTTP/2 Push should be activated. This increases speed and performance a bit and does not usually produce errors. This is not the same case for CSS, that’s why the same setting for CSS is turned off by the way.
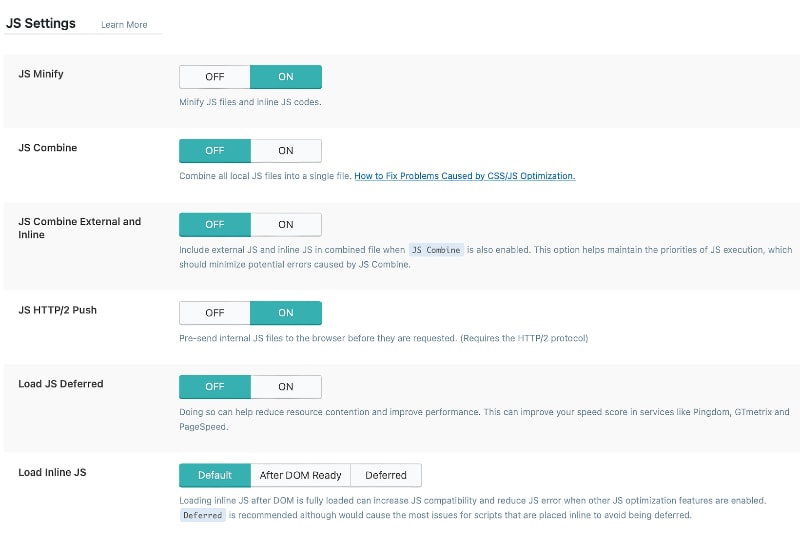
Load JS Deferred is OFF since it regularly gave me some delayed layout shift and/or other issues with Javascript dependent resources, such as dynamically generated menus. I want the menu to be generated instantly from the headings on page, and not delayed. A menu like the one on this post will consist of many entries and if loaded deferred, it will push the whole page down a screen. You don’t want this.
Layout Shift means, that somebody visiting your site and starts reading, and suddenly all the content moves down a significant amount of pixels. I hate it, so do users!
Google has integrated Cumulative Layout Shift (CLS) into their Core Web Vitals and will eventually make this a ranking factor.
Load Inline JS is set to DEFAULT for best performance vs. user experience.
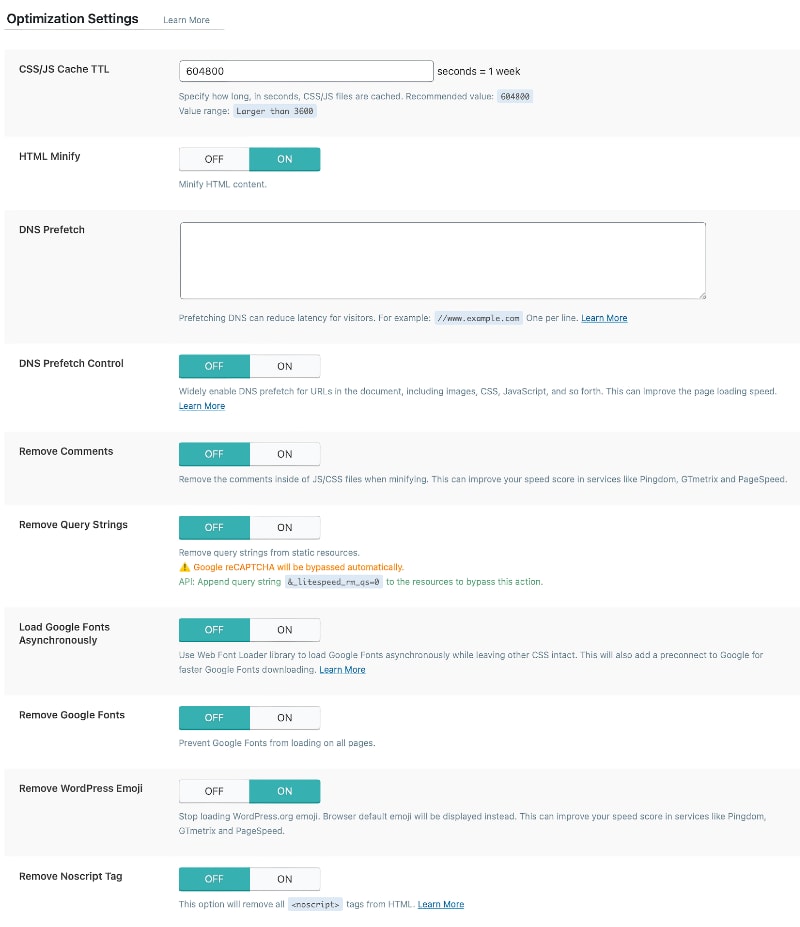
LiteSpeed Cache – General Optimization Settings
The general optimization settings are pretty default. Activate HTML Minify because this is not activated in Cloudflare.
In DNS Prefetch you can include external resources that are accessed by your page. If you do not store everything locally, you should fill this table and set DNS Prefetch Control to ON.
If you use Google Fonts, set Load Google Fonts Asynchronously to increase speed. Alternatively if you use Google Fonts and want to deactivate them (why would you reference fonts you don’t want to use?!), you can set Remove Google Fonts to ON. Otherwise leave this at the default value.
LiteSpeed Cache – Media Optimization Settings
The Media Settings page takes care of Lazyloading and places perfectly sized image containers on the page, to reduce or even eliminate Content Layout Shift (CLS). Use the default image placeholders in grey or white.
Definitely set Lazy Load Images and Responsive Placeholder to ON.
Lazyloading makes sense, so the images are only loaded as-needed when the user scrolls down the page. Look at a long form post like this one with 27421 images (my guesstimation). Not everybody reads the whole post and to load all images upfront makes no sense performance-wise.
Since we are lazyloading, we should Inline Lazy Load Images Library and not put it in an external Javascript file.
Lazy Load Iframes is also helpful and does not hurt, even if you are not using iframes.
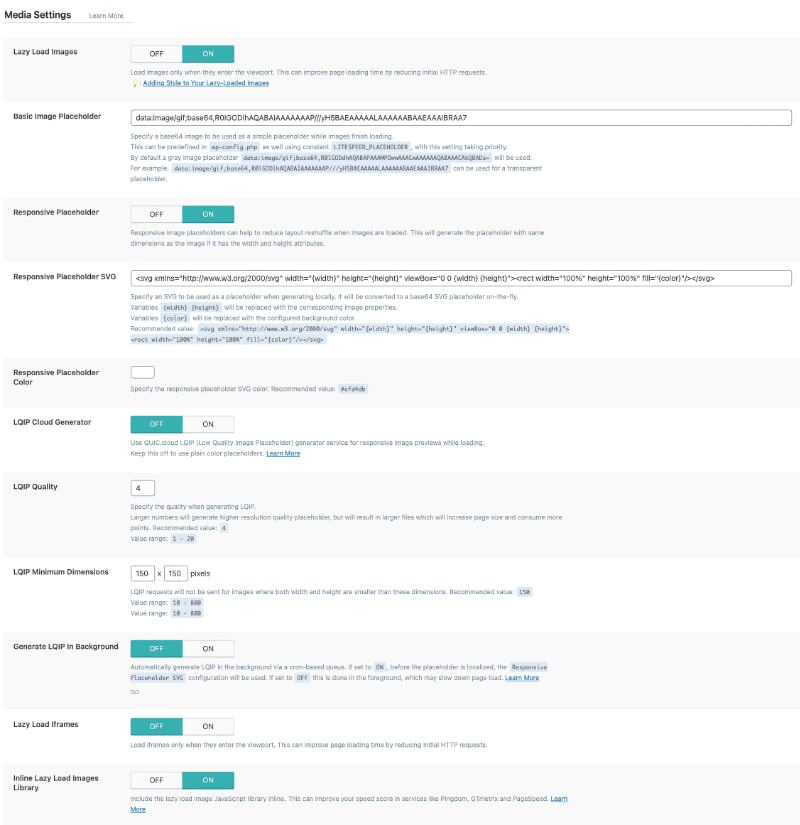
The rest of the WordPress LitesSpeed Cache Plugin’s settings can be kept at their default values.
LiteSpeed Cache – Crawler (CRON)
The idea of the built-in Litespeed Cache crawler is to keep the cache always filled, keep it warm.
This did not work for me, ever, as there will be server-internal crawling requests from the Crawler script to the LSWS -Litespeed Webserver, sometimes unexpectedly resulting in undefined errors. The affected pages will then automatically be put on the blacklist, which – in all of my cases – filled up within a day or two until all pages were on the blacklist. Essentially rendering the Cache Crawler useless.
So I keep the Cache Crawler disabled and use my own cache warmer script, which also automatically detects and heals CSS and Javscript related 404 Not Found caching issues.
I will publish this script along with details explanations in another blog post.
Summary
If you run a blog for fun or for profit, either way you incur costs from hosting, various commercial plugins or themes and other related expenses.
Getting some of the cost back or even turning a profit by monetizing with a partner like Ezoic is something that most of us do.
Running ads decreases site performance, that’s for sure. Anybody telling you otherwise is not telling the truth. But with this step by step tutorial you can make your site faster while still having ads on it.
WordPress – Ezoic – Cloudflare and Litespeed Webserver are a cost-effective team which, if configured correctly, works together like a charm. For you and your visitors!