
| Course Index |
|---|
| Part 1 – Introduction: What is IPv6 |
| Part 2 – IPv6 Addressing & Subnetting |
| Part 3 – IPv6 Headers & Header Extensions |
| Part 4 – ICMPv6 & IPv6 Neighborships |
| Part 5 – IPv6 Configuration, EUI-64, SLAAC & Dual Stack |
| Part 6 – IPv6 DHCP (DHCPv6) |
| Part 7 – IPv6 on Windows |
| Part 8 – IPv6 on Linux |
| Part 9 – IPv6 on Mac |
| Part 10 – IPv6 DNS, Monitoring & Address Management |
| Part 11 – IPv6 Routing |
| Part 12 – IPv6 Security & Tunneling |
| Part 13 – IPv6 Internet Connection & Address Planning |
IPv6 Foundation Part 13: IPv6 Internet Connection Planning & Address Planning
This is the final chapter of the IPv6 Master Class. Now you know all the technical details and you are able to do real-world planning of your Internet connection and local network using state of the art best-practice approaches.
How to do Network Address Planning for IPv6
The IPv6 address space is vast and has to be planned with caution to not waste space and ruin your chances of having a clean and best-practice design. Remember, more than the whole current IPv4 address space fits in a single /64 IPv6 network, which some of us use as a transit link. Think about installing an IPv6 address management solution, such as phpipam. See Chapter IPv6 Address Management for more information.
Having so much space at your disposal means you have to plan extra super accurately, before you are in the middle of the rollout and find our you have made a big mistake and have to start from scratch. We have all been there!
Watch my Video on IPv6 Network Address Planning
Or continue reading, if you prefer.
How to chose the right IPv6 Network Sizes
There are the following best practices for IPv6 Network Sizes:
- The minimum allocation of Regional Internet Registries (RIRs) to LIRs (providers) is /32.
- The allocation from Local Internet Registries (LIRs) to end users is mostly /48.
- Client networks should always use /64 to make Stateless Address Autoconfiguration (SLAAC) possible, if needed
- Transfer networks should always use /127 – or larger, if Next Hop Redundancy Protocols (NHRPs) or multiple nodes are required in the same segment -> then you should use /126 or similar). Don’t use /64 for transit links, see below why!
Why you should always use /127 Transit Links in IPv6 instead of /64
The networking comminity had a very long discussion about the correct size of transfer networks. It continued for years. The two sides of the story were:
Opinion A: all IPv6 networks are /64, no matter how many hosts they have “we have enough addresses, we don’t need to save them”
Opinion B: “let’s not waste addresses, but instead maybe use a single /64 for all the transfer networks we need in one organization”
Finally we have a standard with RFC6164, “Using 127-Bit IPv6 Prefixes on Inter-Router Links”. I fully support this RFC and decision!
By the way: Subnet Router Anycast is deactivated on /127-Links, so the usage of the first (::) address is indeed possible.
Should you use Link-Local/Unique Local (ULA) or Global Addresses for Addressing your IPv6 Infrastructure?
I recommend using only Global addresses for all infrastructure but let’s look at the issue from an objective perspective:
Advantages of using Link-Local/Unique Local (ULA) for addressing your infrastructure:
- Routing protocols use Link-Local addresses anyway.
- The Infrastructure is not reachable (thus not attackable) from the outside.
The disadvantages:
- No traceroute (visibility) and no Path MTU Discovery is possible, because nobody from the outside can reach your local addresses. This makes troubleshooting and visibility very hard.
- Your Infrastructure is not manageable from the outside. This might not be a problem. Maybe it is even an advantage instead of a disadvantage for you.
I do prefer full IP reachability and then regulating access with firewalls. Private IPv6 Addressing for the purpose of “security by obscurity” feels an awful lot like using NAT with IPv4 to secure your private network. I’m glad the NAT times are over, let’s do IPv6 the right way and not make the same mistakes again.
Private IPv6 Addressing for the purpose of “security by obscurity” feels an awful lot like using NAT with IPv4 to secure your private network.
How to get your IPv6 Internet Connection running
Watch my Video on IPv6 Network Address Planning
Or continue reading, if you prefer.
All the different IPv6 Internet Connection Types explained
Let’s look at the different options how you can connect to the native IPv6 Internet without using tunneled technologies.
In my detailed post How to Get Your Own IPv6 Address Space I describe the different ways how you can request your own permanent IPv6 address space.
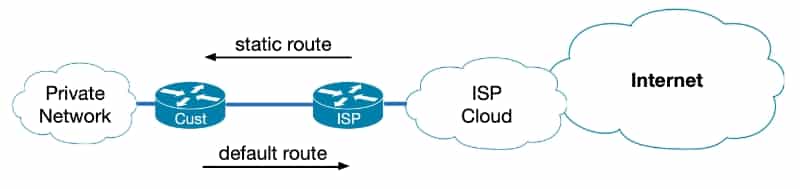
How to Design a Single Homed, Native IPv6 Internet Connection via one ISP
Your IPv6 addresses will be assigned out of the Provider Aggregatable (PA) Space of your upstream Internet Service Provider.
This IPv6 Internet connection is single homed and has no redundancy.
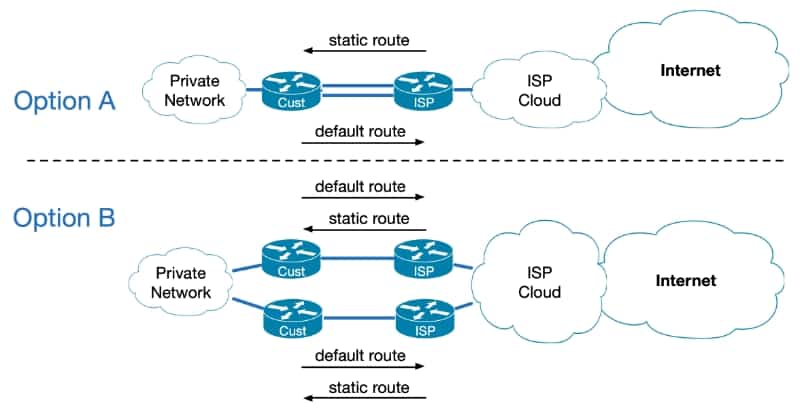
How to Design a Dual Homed, Native IPv6 Internet Connection via one ISP
Your IPv6 addresses will also be assigned out of the Provider Aggregatable (PA) Space of your upstream Internet Service Provider.
This IPv6 Internet connection is dual homed and has limited redundancy.
There are two options how you can implement this:
Option A uses a redundant path between the same hardware, this is the least preferred option.
Option B has hardware redundancy, but is still reliant on one single ISP. If the ISP fails, your connection will be broken regardless of redundant hardware path.
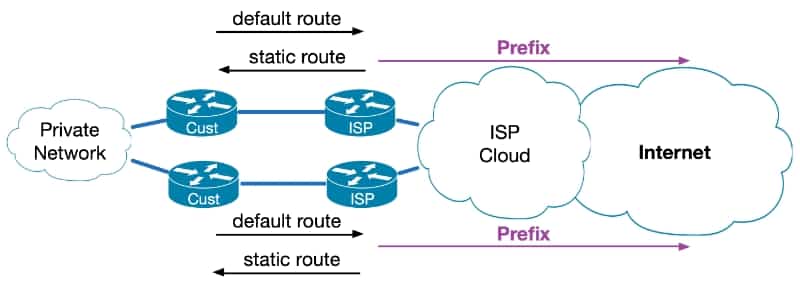
How to Design a Dual Homed, Native IPv6 Internet Connection via one ISP using your own PI Space and have your ISP announce it via BGP
Your IPv6 addresses are out of your own Provider Independent (PI) IP address prefix that you have requested and received.
In this case, to keep configuration low, you ask your (single) Internet Service Provider to announce your PI Prefix via BGP to the Internet for you.
This IPv6 Internet connection is dual homed and has limited redundancy, because you still have only one ISP and if it fails, you fail.
How to Design a Dual Homed, Native IPv6 Internet Connection via one ISP using your own PI Space and announcing it yourself with BGP
Your IPv6 addresses are out of your own Provider Independent (PI) prefix.
With this option you choose to implement BGP on your own routers and announce your IP address prefix via BGP to your provider routers. With this option you have full control over what you announce, how routing is handled and how the Internet sees your network.
This IPv6 Internet connection is dual homed and has limited redundancy, because you still have only one ISP and if it fails, your business does so too.
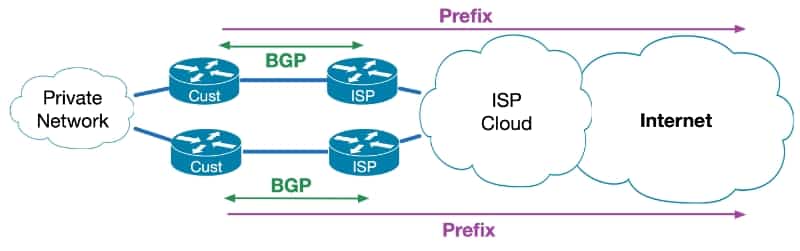
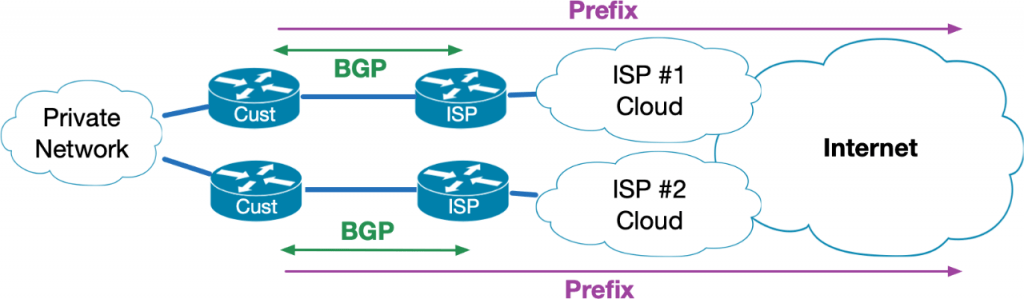
How to Design a fully redundant Multi Homed, Native IPv6 Internet Connection via two ISPs using your own PI Space and announcing it with BGP
Your IPv6 addresses are out of your own Provider Independent (PI) prefix.
With this best in class option you choose to implement BGP on your own routers and announce your IP address prefix via BGP to redundant routers of two different Internet Service Providers. With this option you have full control over what you announce, how routing is handled and how the Internet sees your network.
This IPv6 Internet connection is multi homed and has full redundancy, because you have redundant hardware, redundant paths and redundant ISPs, while relying on your own IP address space.
By the way, the multi homed option with two ISPs is only available if you have your own PI or PA address space. It is not possible for the one provider to route address space of the other provider, only if it is your own!
What are NAT64 and DNS64?
Watch my video or continue reading.
NAT means Network Address Translation and this always reminds me of IPv4. We still need to talk about this technology. If you want to read more, I found this article from Juniper Networks about NAT64 and DNS64 helpful.
NAT64 is defined in RFC6052 and RFC6146.
With IPv6 there is no NAT anymore, as there was in IPv4 (I like that).
A bridging technology called NAT-PT (NAT Protocol Translation) was added to IPv6, but then removed from the standard again (deprecated).
NAT64 is made for IPv6-only clients, to access IPv4-only servers.
To achieve this, NAT64 routers must be dual stack. Remember, that means they need to have at least one IPv4 and one IPv6 address
DNS64 was definied in RFC6147 and works with NAT64:
The DNS64 relay server intercepts DNS requests from clients and responds with a AAAA record, if the server only has an A record. IPv6-only clients could otherwise not reach an IPv4-only server!
The following process enables this technology, that is nice to have but should not really be used in production if you ask me:
- The client sends a DNS request for a AAAA record.
- The DNS64 server (relay) only finds an A record (IPv4) and creates a AAAA record with the NAT64 prefix and the embedded IPv4 address.
- The DNS64 server provides the AAAA record to client.
- The client sends traffic to the NAT64 router with a target prefix of 64:ff9b::/96 + IPv4 address.
- The NAT64 server creates a mapping between the IPv4 and IPv6 addresses.
Recommended Resources for additional reading
Apart from the links throughout this course I recommend the following resources for additional information:
- The Internet Society (ISOC) IPv6 Portal
- Test your IPv6 connectivity on test-ipv6.com
- The official IANA list of assigned IPv6 address space is very interesting
- The Google IPv6 deployment statistics
- The RIPE NCC IPv6 working group and mailing list
Book recommendations on IPv6
I can recommend the following 3 books which I enjoyed reading:

This concludes IPv6 Foundation Part 13: IPv6 Internet Connection Planning & Address Planning of the original IPv6 Foundation Master Class and the class itself (This was the last part already!).
Previous Part: IPv6 Foundation Part 12: IPv6 Security & Tunneling
Back to IPv6 Foundation Course Index
Congratulations! You have completed this IPv6 Foundation Master Course and your are now an IPv6 Expert!